Canning, A Zero Waste Vegan Tool

#VeganMoFo Day 5 – Canning, A Zero Waste Vegan Tool
Canning can be a great zero waste tool. It’s been around since the age of Napoleon Bonaparte, when they discovered they could preserve food for army troops during the Napoleonic wars. The freezer is great for keeping food on hand and expanding storage time, but they can fill up and the power can go out for extended times, leading to mass defrost and spoilage. The answer can be canned food, and the good news is we can CAN it ourselves at home. This post is meant as an overview of home canning, and does not replace or represent itself to be an official guide for proper canning at home. It is important to consult safe canning sources, which will be listed at the end of this post.

Home canned vegetable stock
Proper canning destroys harmful microorganisms, such as molds, yeasts, enzymes, and bacteria that cause food spoilage and creates a partial vacuum in the jar to prevent these same microorganisms from later entering from the outside of the lid. These potentially harmful microorganisms grow between 40-185 degrees Fahrenheit, so we want to ensure our foods are processed above these temperatures for sustained time to allow heat to completely penetrate the contents. Note, some foods aren’t safe to can at all due to their density, such as pumpkin butter or tofu, as heat penetration is inconsistent throughout the contents. Failing to use proper methods, inadequate heat or time, can lead to potentially deadly food poisoning from Clostridrium botulinum (botulism), so it’s always, ALWAYS, ALWAYS important to follow directions from current, safe canning sources.
Our foods have changed over time. The acid and sugar contents of our fruits and vegetables differ dramatically today from those even a decade ago (for an interesting and enlightening read, check out Eating on the Wild Side: The Missing Link to Optimum Health by Jo Robinson that talks all about how different current produce is from heritage produce). Heirloom canning recipes from our parents and grandparents, especially those using flour, cornstarch, and lime, may no longer be safe due to changes in produce. In addition, older editions of canning guides may no longer be applicable, so it is a good practice to update your canning cookbooks every couple of years.
There are two different methods of canning, boiling water bath canning and pressure canning, and the distinction between the two are extremely important to understand and they are NOT interchangeable! Water bath canning is used for canning foods that contain natural acids or are canning in an acid liquid and have a pH of 4.6 or less. Common acid foods for canning include: apples, tomatoes, pickles, mustard, jam, etc., depending upon their preparation. Pressure canning is used for low-acid foods with a pH higher than 4.6. Low acid foods can include: vegetable stock, soups, green beans, dried beans, potatoes, etc.
Boiling Water Bath Canning
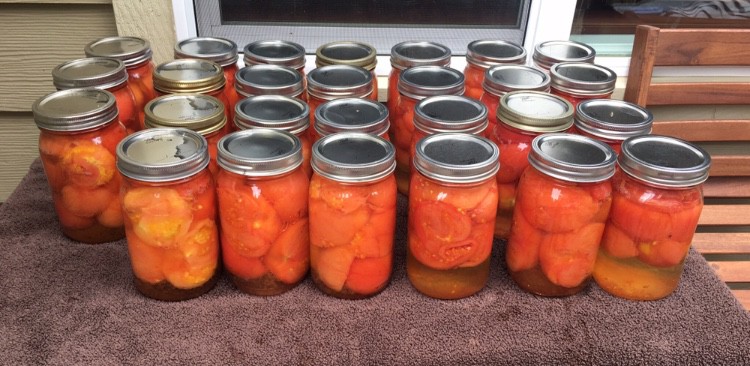
Home-canned Whole Tomatoes
Boiling water bath canning is a great way to start your foray into canning, as it is the least technical and less intimidating. Again, it is used for acid foods only. To put it simply, jars containing acid foods are boiled in water that covers the lids by approximately two inches. As water comes to and sustains a boil, the air and contents within the jar expand, pushing air out of the jar, into the water, and escape into the air. When the jar is removed from the boiling water at the end of the processing time, the pressure outside of the jar (atmospheric pressure) is greater than that in the inside of the jar due to the lost air, pushing the lid down onto the rim of the jar, creating a vacuum seal (it appears as though the lid is sucked down onto the rim of the jar, but it is actually being pushed down onto the jar from the outside due to the pressure differential). In the process of heating, microorganisms are also destroyed, as long as the water is at boiling temperature throughout the entire processing time. If boiling ever stops, the timer must be reset to zero and started again.
Pressure Canning

Home-canned Beans
Pressure canning requires a pressure canner. In this process, jars containing low-acid foods are put into a pressure vessel with some water. A lid with a steam-tight seal is locked down and the water inside is boiled to force the air inside the canner out of a small vent hole in the top of the lid. Once all the air is expelled, a regulating device is set on the vent, slowing the escape of steam and creating pressure within the canner. As pressure increases, the boiling point of water increases, allowing temperatures within the canner to exceed normal boiling temperature. Most guidelines have you maintain a pressure of at least 11 PSI, which, over time, creates an internal temperature of more than 240 degrees Fahrenheit, enough to kill microorganisms in the food. As in the case with boiling water bath canning, heating of the air and contents within the jar causes air to escape the canning jar, creating a vacuum inside the jar when it is removed to normal atmospheric pressure outside of the pressure canner. It is important to maintain the minimum pressure the entire processing time; if pressure ever falls below this level, the timer must be rest to zero and started again. Note, an Instant Pot is a pressure cooker, not a pressure canner. You cannot can in a regular Instant Pot, but you can in the new Instant Pot Max release Fall of 2018, which will go up to 15 PSI and may be suitable for home canning.
Things are a bit more complicated with pressure canning, which is why some folks tend to shy away from it. But it’s not so complicated to make it difficult, it just takes attention and focus. Of course, you should always read, understand, and follow the instructions for your pressure canner, but here are some general principles for using a home pressure canner. First, your pressure canner should be in excellent condition and well-maintained. Home pressure canners should be tested annually and most University Extension offices have free or low-cost pressure canner testing services (Washington State University Extension does this for Washington State, but you can check with your local health department for testing resources in your area). Pressure valves can lose calibration, in fact, both of my pressure canners are 1 PSI off, meaning I have to take my pressure gauge to 1 PSI higher than recipes call for, which is important information to know! Second, the seal, safety valve, and pressure vent must be in excellent condition, clean, and intact. I remove the seal from the lid in the off-season for storage so it does not get damaged or misshapen. You want to make sure your lid is clean underneath the seal and that the pressure vent is clean and completely unobstructed. An obstructed pressure vent can lead to rapid overpressure, leading to blowing out of the safety valve, or worse, exploding failure of the pressure canner itself! This is the thing most people are fearful of, but if you maintain your pressure canner and make sure it is clean, it should not be an issue. And, you can also turn off the heat to your pressure canner to reduce the pressure, or at least keep the pressure from continuing to build, should the vent become blocked at any point. Third, ALWAYS attend your pressure canner while it is heating. That means if you are canning something that takes 90 minutes at 11 PSI, you will be babysitting that canner for the ENTIRE 90 minutes to make sure it maintains the minimum 11 PSI the entire time. I bring a book, play games on my iPhone, write blog posts and check the pressure gauge often. Forth, do NOT remove the pressure regulating device or try to open the lid while the contents are under pressure as you may cause failure of the canner and/or glass jars within the pressure canner. Once the time is up, turn off the heat, leave the pressure regulating device in place, and allow the pressure to reduce naturally to 0 PSI. Do not try to cool the pressure canner with wet towels, this pressure time is included in the safe canning time and is necessary. Once the pressure is at 0 PSI, remove the pressure regulating device, wait 10 minutes, then open the canner, lifting the lid away from you to prevent exposing yourself to hot steam.
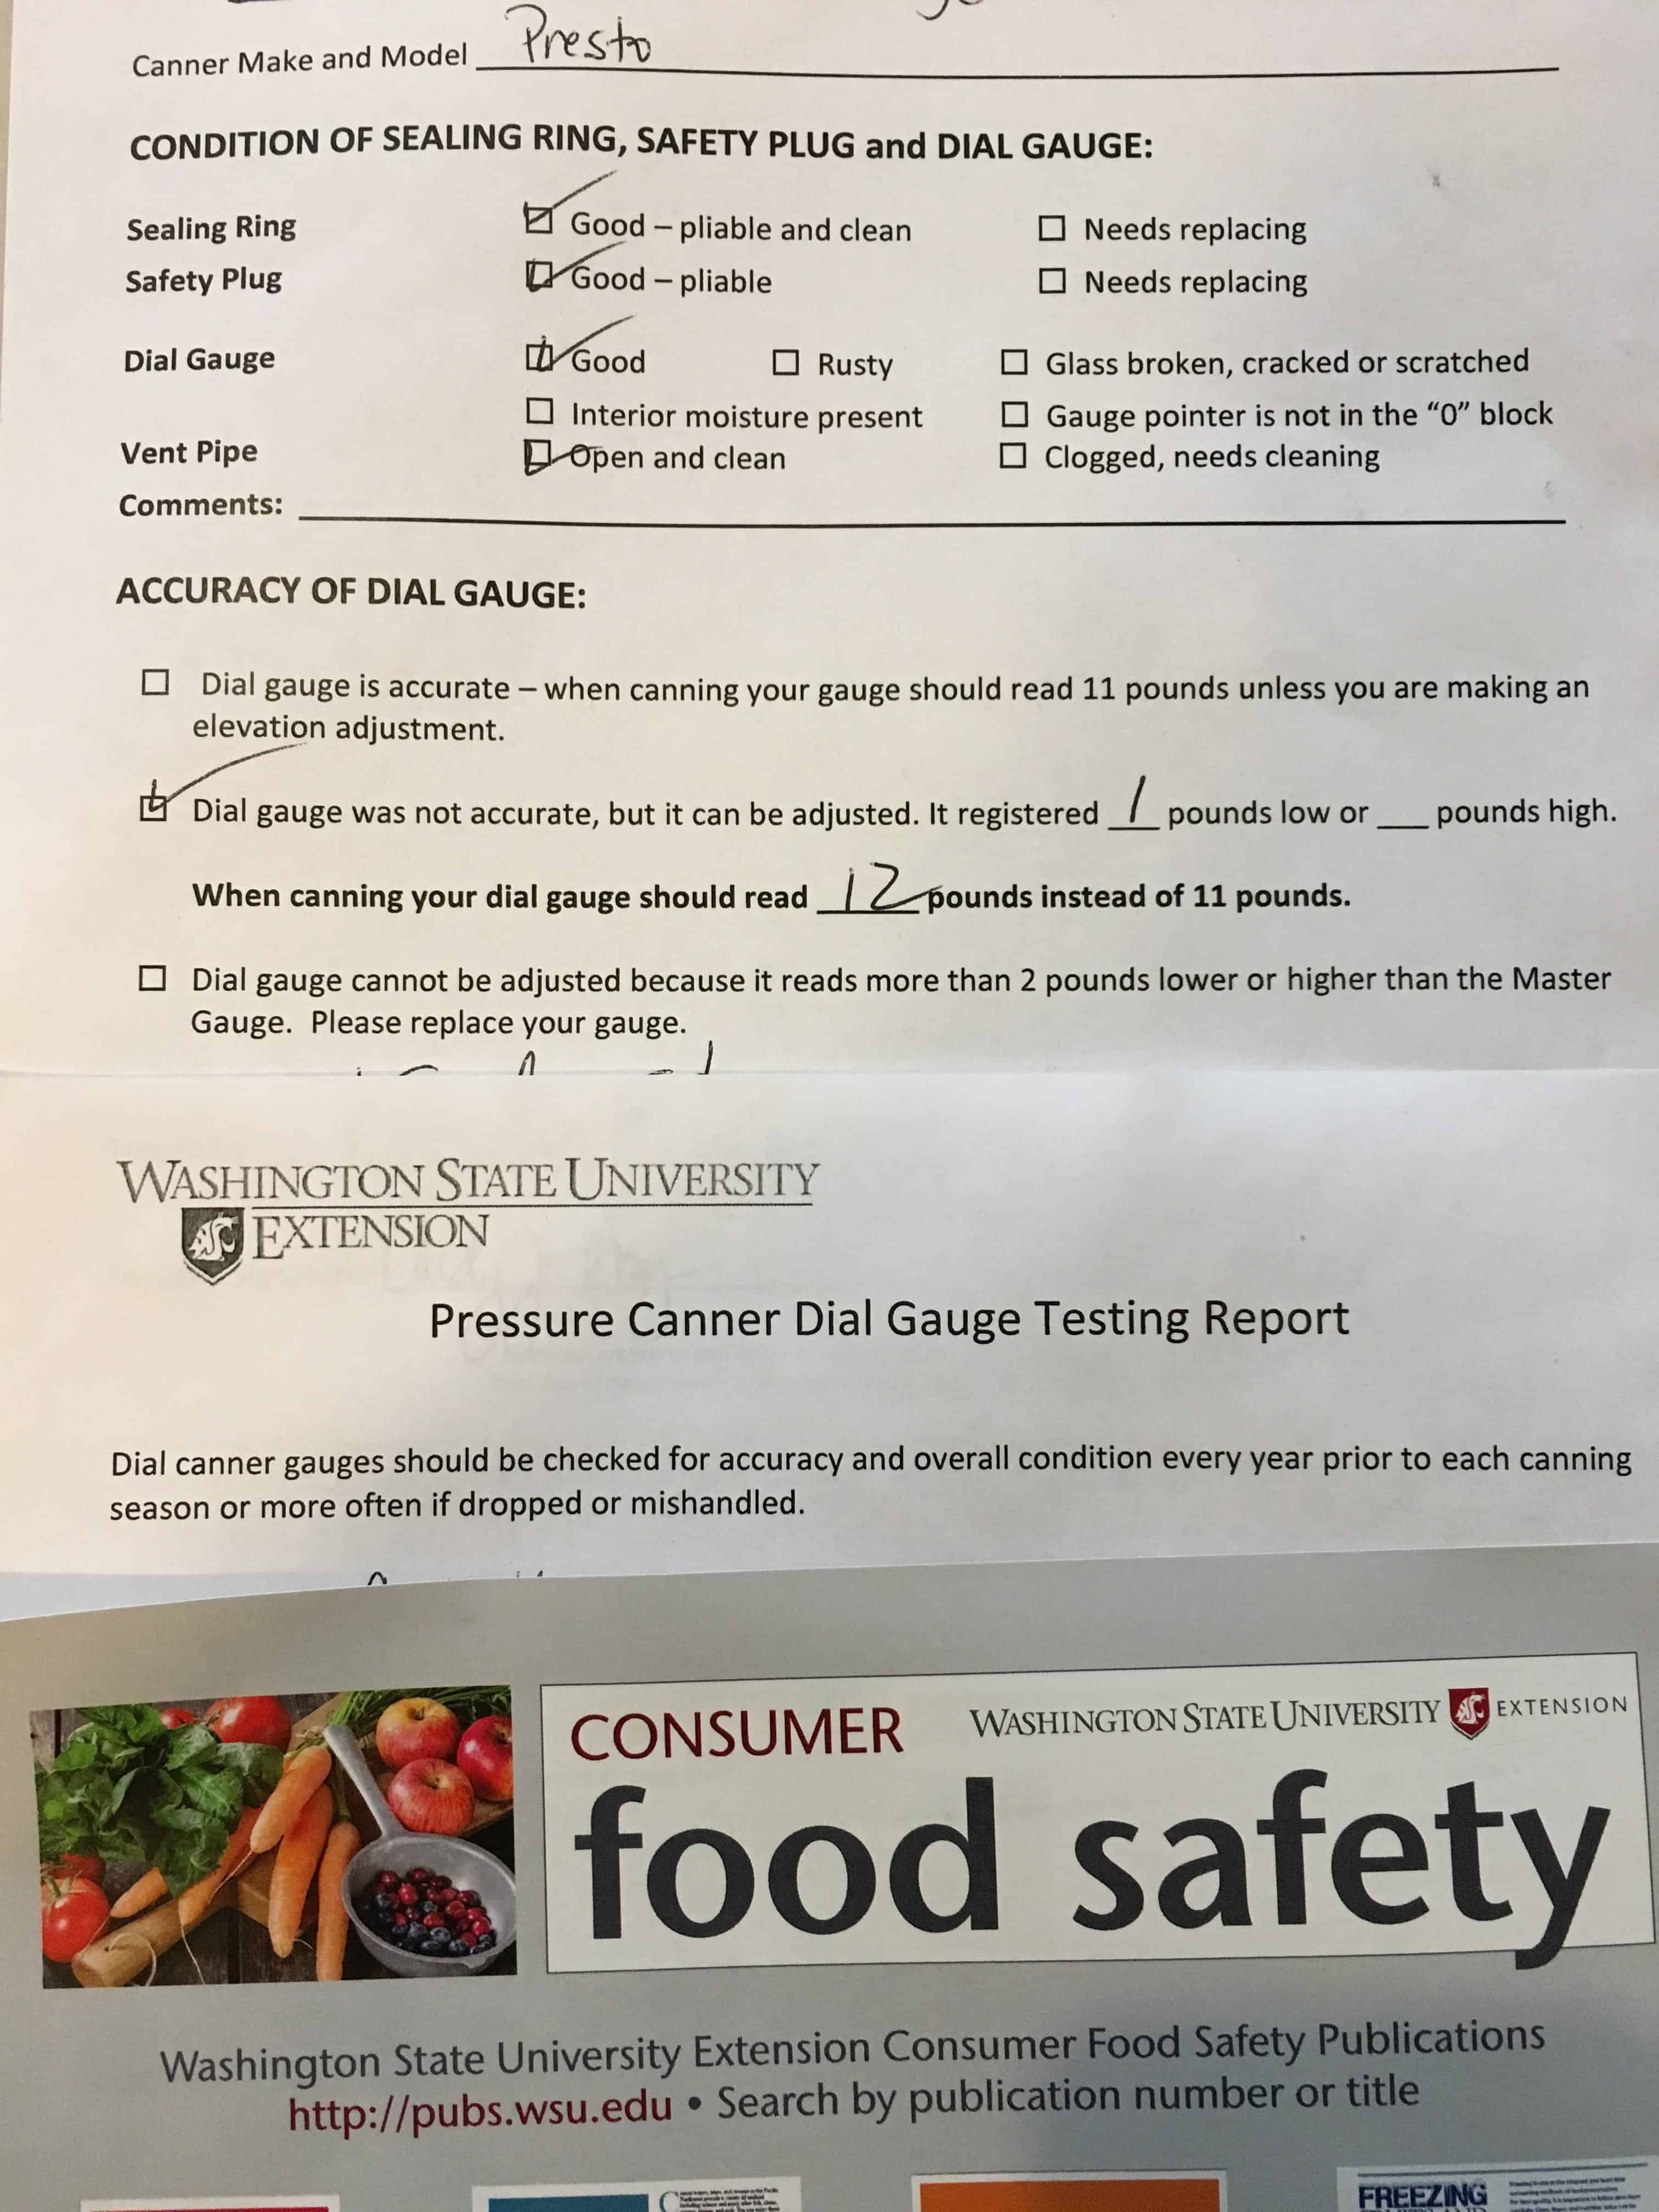
Results from Pressure Canner Test from WSU
Do note that elevation above sea level can affect pressure and canning times. So it’s always important to know your elevation and make adjustment as noted in safe canning guides.
My Canning Setup
I have two pressure canners and a large boiling water canner. I generally use our big two-burner propane camp stove for canning, that I set up either on our outside deck off our kitchen or in the garage with the big overhead door open (please, please, please, NEVER use a gas camping stove indoors or in a garage without adequate ventilation–you risk a build-up of deadly carbon monoxide!).

Home-canning Setup with Propane Camp Stove
Equipment Needed

Supplies for home-canning
- Boiling water canner or pot large enough to hold jars with 1-2 inches of water over the top of the lids
- Pressure Canner
- Rack for bottom of canner – Some people don’t use these, but they help prevent jars from breaking when rattling against the bottom of the canner during boiling. I used an old wooden one my grandfather had made eons ago until it finally broke.
- Jar lifter – keeps you from burning your fingers when you put jars into hot water or lifting them out!
- Jar funnel – they make metal ones for either regular or wide-mouth jars. They help prevent a big mess
- Ladle
- Non-metallic spatula or stick – used to remove air bubbles inside the jar that can lead to pockets for microorganisms to survive in your sealed jar. There is concern that metal utensils can damage the jar, so I use a wooden chopstick
- Jars – your preference of type. However, do not try to use old commercial mayo or pickle jars as they will generally break during the home canning process (words of experience! There’s nothing so sad as to take all that time and effort to put prepared food into a jar only to have it break and spill the contents all over inside your canner)
- Lids – your preference that goes with the type of jars you select
- Bands – your preference that goes with the type of jars you select
- Timer
- Food Mill or Food Press with Pestle – use for making applesauce, jams, jellies, tomato sauce/paste
- Thermometer – to ensure water temperature in boiling water canner
- Extra Sealing Ring and safety valve for Pressure Canner – make sure you get the correct ring for your particular canner. Nothing’s worse that getting everything all prepped and into your jars only to have a leaky seal and no replacement (again, words of experience!)
Filling your jars
When you fill your jars, you need to be mindful of how much space there is from the top of your food/liquid and the rim of the jar. This is called head space. Head space is required to allow for the expansion of foods when heating. If you do not allow enough space, food may be forced out of the jar during processing and prevent the lid from sealing. Your canning guide will tell you how much head space is required for each recipe.

Home canned tomato salsa
After you fill the jars, you want to wipe the rim, even if you used a funnel, to ensure there is no food between the glass rim and the lid, which would prevent a proper seal. Lids used to require soaking in hot or simmering water, but new lids do not require this. Follow the instructions for the particular lids you are using. A screw-on band is usually required, and this is screwed on finger tight, not wrenched on, to allow air to escape during processing in order to create the vacuum seal. Make sure to process the jars immediately, while the contents are hot, to avoid spoilage or jar breakage during processing.
After Canning
One of the most satisfying sounds in the world, I think, is the metallic pop lids make when the jars cool and the lids seal! Remove the jars from the canner with a jar lifter and set upright on a wooden board or surface protected with a towel. Note, these jars are HOT, HOT, HOT and will damage or discolor formica or metal surfaces, so be mindful of where you put them. I use a towel on my granite countertop without any problem, but I have made permanent rings on my outdoor stainless steel table from setting hot jars on it. Allow the jars to cool for 12-24 hours and check the lids for seal (the center of the lid should be pushed down) before removing the bands and storing. Do not cool them outside or in a refrigerator as the temperature fluctuations can disrupt the seal. The band should be removed prior to storage as they can be difficult, if not impossible, to remove later due to corrosion, rust, or sticky residue, and they can sometimes make a false seal of a lid that did not properly seal during processing. Follow the guidelines for your particular lids, but they are generally good for 12-18 months of food storage, depending on the lid. Label and keep the jars in a cool, dark storage place.

Stored home canned foods in pantry
If any of your jars do not seal after 24 hours, you can eat the food, store it in a refrigerator and eat within normal refrigerated storage time for that food, freeze, or remove the lid and reprocess with a new one.
Resources
There are some great resources available for home canning. Internet resources are fantastic as they are generally most up to date. There are some standby books, but remember to get new ones every few years to be current with updated guidelines.
Ball® Blue Book® Guide to Preserving
National Center for Home Food Preservation
Washington State University Extension Food Preservation
Iowa State University Preserve the Taste of Summer Online Canning Class
Ball® and Kerr® Fresh Preserving Website
My Vegan and Whole Food Plant-Based Canning Facebook Group

Happy canners (Author, left. Friend, right)
Again, canning is a great zero waste tool. It’s been around for over 200 years, time-tested, and grandma-approved! Going back to our roots gives us a plastic- and endocrine-disruption-free alternative that’s good for the planet and ourselves. Give it a try. Find a class or a friendly neighbor or family member to show you the ropes. I’ll be sharing a bunch of posts about what I can—maybe it will inspire you to give it a go.
Do you like this post? Please share....
[mashshare]
4 Comments
Leave a Comment
If you liked this post, you might like one of these:
Tags:

[Trī-māz-ing]
Cindy wants you to be Trimazing—three times better than amazing! After improving her health and fitness through plant-based nutrition, losing 60 pounds and becoming an adult-onset athlete, she retired from her 20-year firefighting career to help people just like you. She works with people and organizations so they can reach their health and wellness goals.
Cindy Thompson is a national board-certified Health and Wellness Coach, Lifestyle Medicine Coach, Master Vegan Lifestyle Coach and Educator, Fitness Nutrition Specialist, Behavior Change Specialist, and Fit2Thrive Firefighter Peer Fitness Trainer. She is a Food for Life Instructor with the Physicians Committee for Responsible Medicine, Rouxbe Plant-Based Professional, and Harvard Medical School Culinary Coach, teaching people how to prepare delicious, satisfying, and health-promoting meals.
She provides health and lifestyle coaching at Trimazing! Health & Lifestyle Coaching. Cindy can be reached at info@trimazing.com.
Subscribe to the Trimazing Blog
Receive occasional blog posts in your email inbox.
Subscribe to the Trimazing Blog
Receive occasional blog posts in your email inbox.




Awesome content! I remember canning your family recipe of corn relish with you a few years ago. Fun and educational afternoon!
Thank you, Scott! Canning all that corn relish was a blast–we should do that again sometime!
Very informative post! I've never done any actual canning (the closest I've come is pickling cucumbers for quick use, haha) so I'm very impressed by all of this!
Thank you! Canning pickles is really easy. There are a lot of pickle guides out there and many recipes make only a couple of quarts, so if you have a small amount of veggies you want to pickle, you can make up a small batch. You can pickle just about any vegetable, so try it and have fun with it!